
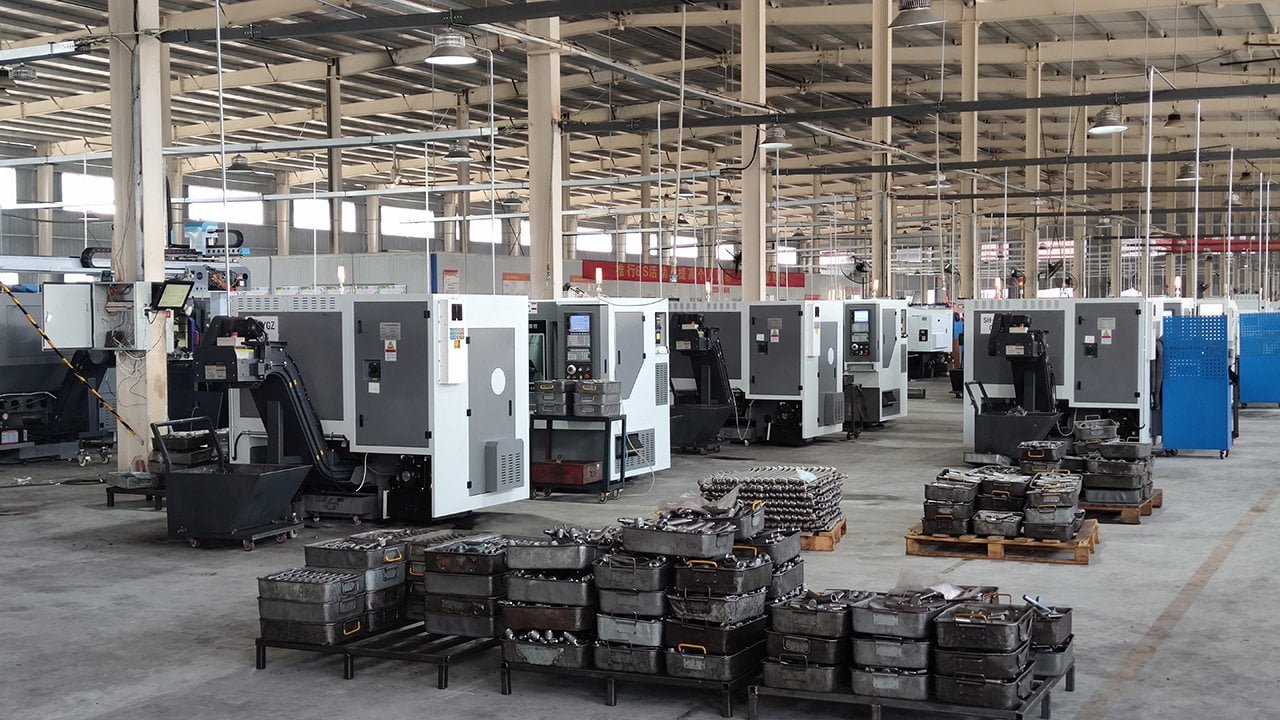
Every time, we examine returned sway bar links that installers swear are defective. But when we inspect the threads, the bushings, and the ball joint stud, the physical evidence usually tells a different story — one of torque error, not product failure.
Most installers assume that if a sway bar link fails within months, the part must be faulty. Yet in our analysis of returned parts at GDST, we have found that many premature failures are directly traceable to how the part was installed. The mistake is not in choosing a bad part — it is in how tight the nut was turned, and whether the suspension was loaded when the bolts were torqued.
When a wholesaler or distributor receives a warranty claim, the decision is simple on paper: approve or reject. But in practice, the wrong call costs money. Approve a false claim and you lose the part cost, the freight, and the credibility with your own supplier. Reject a legitimate claim and you damage a customer relationship. The skill is in reading the returned part.
Every installation mistake leaves a physical fingerprint on the part. A loose bolt leaves witness marks from fretting and galling.1 An over-torqued bolt leaves thread stretch and a deformed locking nut. A bushing pre-loaded at droop leaves asymmetrical compression and tearing on the unloaded side. These fingerprints are not subjective — they are measurable, photographable, and defensible. When you know what each one looks like, you can decide a warranty claim in under two minutes without calling the installer.
But identifying a mistake is only half the value. The real win is being able to explain the rejection to your customer in language they can verify themselves. When you can say, "Look at the thread stretch on the third visible thread — the bolt yielded because it was over-torqued by roughly 30%," the conversation shifts from a dispute about quality to a shared understanding of physics. That saves your relationship and reduces future returns.
Below, we walk through the four most common installation errors, what each one looks like on a returned part, and how to distinguish an installer mistake from a genuine product defect — so you can manage warranty claims with confidence and educate your downstream customers without confrontation.
Why Does a New Sway Bar Link Become Loose After Installation?
A loose sway bar link usually leaves visible evidence of movement on the threads, the ball joint stud, or the bushing sleeve. That evidence is distinct from the polished wear surface of a normal ball joint articulation.
When a customer reports a clunk or rattle from a newly installed sway bar link, the first instinct is to blame excessive clearance in the ball joint. We see returned parts marked "ball joint loose" at least twice a month. But when we put a dial indicator on the stud and measure clearance, most of these parts are within OE specification. The real problem is that the nut was never tight enough to clamp the joint properly.
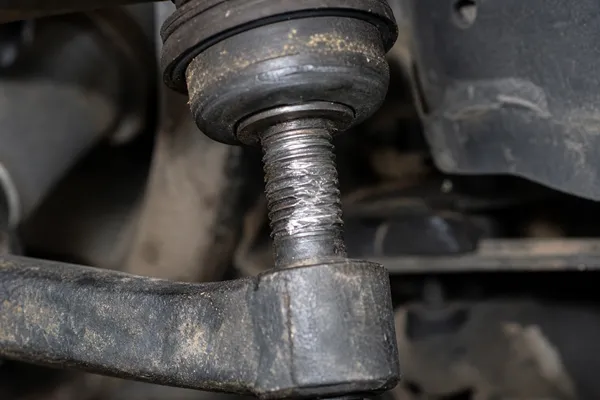
What loose-installation damage looks like on a returned part
The physical markers are visible without laboratory equipment:
- Fretting marks on the washer face — a bright, polished ring where the washer has micro-vibrated against the mounting bracket. This indicates the clamping load was too low to prevent relative motion.
- Galling marks on the threads — These rough metal marks usually appear when the nut is not tightened enough and the stud moves repeatedly under vibration.
- Witness marks on the ball joint socket — a loose nut allows the stud to slide axially in the taper, leaving a circular burnish mark on the spherical surface of the socket. This is often mistaken for "excessive wear" by an inexperienced inspector.
Why this matters for the technical support reader
If you see these signs, the part is almost certainly not defective. The ball joint itself may have 0.2 mm of clearance — well within spec — but because the nut was under-torqued, that clearance translated into audible noise. The correct response is to reject the warranty claim and explain that the part was installed below the minimum torque specification. Provide a photo of the galling or fretting marks as evidence.
However, there is one caveat. If the threads show no fretting, the washer face is unmarked, and the nut is tight, but the ball joint still has excessive axial play (over 0.5 mm on most passenger-car links), that is a genuine product defect. We have seen both scenarios, and the difference is straightforward once you know where to look.
Signs of Over-Torque Damage on Returned Sway Bar Links
Yes. Over-torquing a sway bar link bolt deforms the threads beyond their elastic limit, cracks the nylon locking insert, or distorts the ball joint socket — and all three failure modes can look like a broken product to an uninformed inspector.
The instinct to "tighten until it feels solid" is the single most damaging practice in sway bar link installation. Many installers rely on impact guns or guesswork instead of using the recommended torque value. Excessive force can damage the threads, locking nut, or ball joint structure. That extra force does not make the joint more secure — it stretches the bolt plastically, reduces its clamping load, and often embeds the locking nut's nylon ring deep enough to lose its self-locking function.
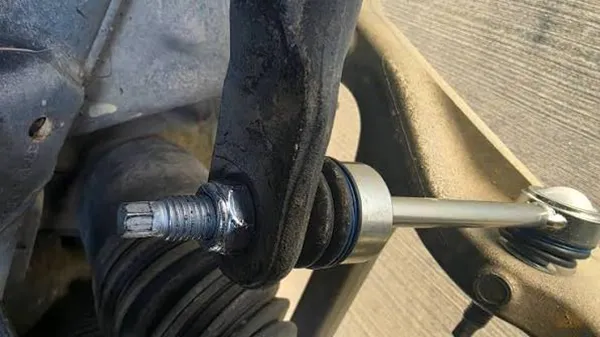
Physical evidence of over-torque on a returned part
- Thread stretch — the bolt shank narrows visibly just below the nut, and the threads appear "thinned" or "necked down" under magnification. On a metric thread, you can sometimes see a slight reduction in the major diameter measured with a caliper.
- Cracked nylon insert — the locking element in a prevailing-torque nut is designed for one-time use anyway, but extreme over-torque cracks the nylon ring radially. A cracked insert means the nut no longer resists loosening, even though it was installed correctly.
- Distorted ball joint socket — on pressed-in or crimped designs, over-torque can ovalize the socket, creating a tight spot that binds the stud. This is rare but we have documented it on heavy-duty truck links where installers used an impact wrench without a torque limiter.
How to distinguish over-torque from a manufacturing defect
A broken ball joint stud that snaps during installation might be caused by either a brittle material defect or over-torque. Here is the decision tree:
| Observation | Likely Over-Torque | Likely Material Defect |
|---|---|---|
| Threads show visible necking or thinning | Yes | No |
| Fracture surface is ductile (rough, grainy) | Yes | No |
| Fracture surface is brittle (smooth, crystalline) | No | Yes |
| Nylon insert is cracked or displaced | Yes | No |
| Bolt head sheared off below the flange | No | Possible — check material certification |
If the fracture is ductile and the threads are stretched, the bolt yielded in tension before it broke — that is installation error. If the fracture is brittle and the threads are intact, the material failed below its expected strength — that is a supplier issue. We have seen both outcomes in our returned parts bin, and we document each one with photographs for exactly this reason.
Why Should Sway Bar Links Be Tightened at Ride Height?
Yes. Tightening sway bar link bolts while the suspension is at full droop pre-loads the bushings in an unnatural position, causing premature tearing, binding noise, and accelerated wear that looks like a defective bushing to the untrained eye.
This is not a material defect. It is a geometry error. A sway bar link connects the stabilizer bar to the control arm or strut. When the suspension is hanging at full droop — both wheels off the ground — the distance between the bar's attachment point and the control arm is at its maximum. If you tighten the link bolts in this position, the bushings are compressed asymmetrically to hold that longest position. When the vehicle is lowered to ride height, the bushings are forced into constant torsion and shear, even when the vehicle is parked.
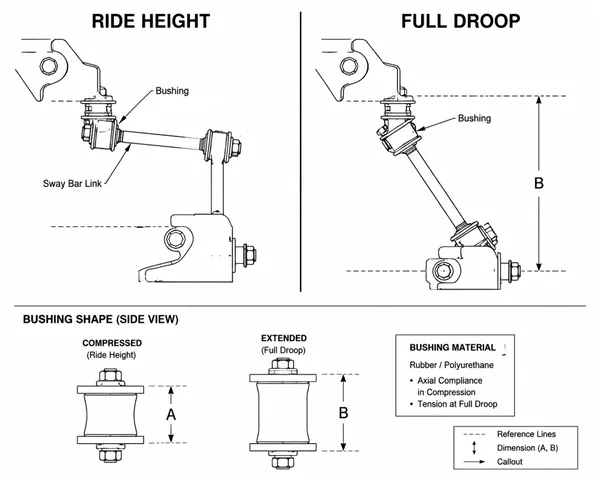
What droop-installed bushings look like on a returned part
- Asymmetrical bushing compression — the rubber is squeezed more on one side than the other. This is easy to spot by cutting the bushing in half and measuring the wall thickness on both sides. A properly installed bushing shows even compression.
- Tearing at the bushing-to-sleeve bond — the constant torsion during normal driving peels the rubber away from the inner sleeve on the loaded side. This looks like a delamination defect, but it only occurs on one side and is aligned with the direction of the pre-load.
- Binding noise described as "creaking" or "groaning" — the bushing is forced to twist beyond its design range during every suspension movement, generating friction that sounds like a dry joint. The bushing surface may appear glazed or polished in a line corresponding to the bind path.
How to confirm this on a returned part
Ask the end customer: "Was the vehicle on the ground when you torqued the bolts, or were the wheels in the air?" If they cannot answer, cut the bushing open. Asymmetrical compression on a bushing that is otherwise within specification is definitive evidence of incorrect installation geometry. We recommend photographing the cut bushing cross-section and including it in your rejection documentation.
The OE service manual for virtually every vehicle with a sway bar link specifies that the bolts must be tightened at ride height — meaning the vehicle is on the ground with its full weight on the suspension. Some manuals even specify placing ramps under the tires to simulate static load. This is not a GDST recommendation; it is the manufacturer's specification.
How to Tell Installation Errors from Sway Bar Link Defects
Use a three-step physical inspection: check the threads, check the nut, and check the bushing. If any of these show the markers described above, the failure is almost certainly installation-related, not a product defect.
When a returned part arrives, you have five minutes to make a decision. Here is a workflow we use in our own quality lab when analyzing customer returns:
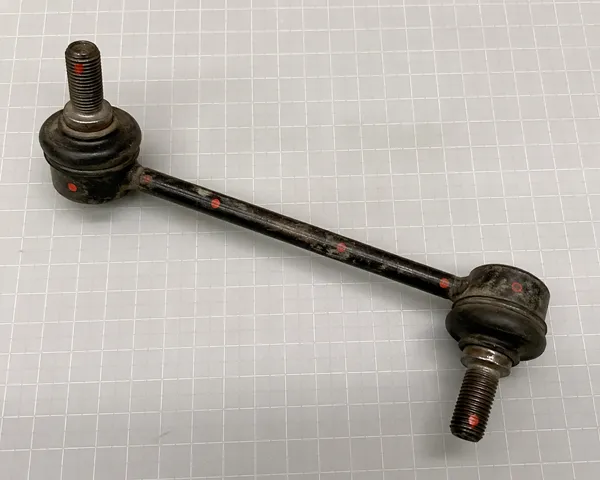
Step 1: Thread inspection (30 seconds)
- Magnify the threads with a 10× loupe or a smartphone macro lens.
- Look for necking (reduced diameter on the shank just below the nut) → over-torque.
- Look for galling (rough, silvery patches on thread flanks) → under-torque or loose nut.
- Look for clean, undamaged threads with no necking → proceed to Step 2.
Step 2: Nut inspection (20 seconds)
- Remove the nut carefully.
- Inspect the nylon locking ring. Is it cracked, flattened, or missing material? → over-torque or reuse of a new nylon insert nut (common mistake).
- Does the nut thread on smoothly by hand with no resistance? If yes, the locking element is worn out and the nut was either reused or over-torqued.
Step 3: Bushing inspection (60 seconds with a knife or hacksaw)
- Cut the bushing axially through the center of the sleeve.
- Measure the rubber thickness on both sides of the sleeve.
- Ratio greater than 1.3:1 (one side 30% thicker than the other) → pre-loaded at droop.
- Look for tearing at the bond line. If tearing is present but compression is even → possible bond defect. If tearing is accompanied by asymmetrical compression → installation error.
Step 4: Ball joint clearance check (90 seconds)
- Clamp the link in a vise by the ball joint socket.
- Attach a dial indicator to the stud and measure axial play.
- Most passenger-car links should have less than 0.3 mm of axial clearance when new. OEM spec for many applications is 0.1–0.2 mm.2
- If clearance exceeds 0.5 mm and Steps 1–3 show no installation error, the joint is defective. This is legitimate warranty.
Step 5: Decision
| Inspection Results | Diagnosis | Recommended Action |
|---|---|---|
| Necked threads or cracked nut | Over-torque | Reject claim. Send photo evidence. |
| Galling or fretting on threads/washer | Under-torque (loose) | Reject claim. Recommend torque wrench. |
| Asymmetrical bushing compression | Tightened at droop | Reject claim. Explain ride-height rule. |
| Clean threads + intact nut + symmetrical bushings + high ball joint play | Manufacturing defect | Approve claim. Issue credit. |
Frequently Asked Questions
What is the most common cause of premature sway bar link failure?
Based on our return data from the last three years, the most common single cause is incorrect torque — either too loose or too tight — accounting for roughly 55% of all premature failures. The second most common is tightening at full droop, at about 20%. Genuine manufacturing defects represent fewer than 10% of returns.3 The remaining cases are normal wear beyond the expected service life.
How do I know if a returned sway bar link was over-torqued without special tools?
You do not need a tensile tester. Use a caliper to measure the thread diameter on the shank just below the nut. Compare it to the diameter of an unused thread on the same stud or a new part of the same specification. A reduction of more than 0.05 mm indicates the bolt yielded plastically.4 This is a standard QC check used by OE suppliers worldwide.
Should I replace sway bar links in pairs?
Professionally, yes. Replacing only one side subjects the new link to offset forces from the old, worn link on the opposite side. The new link will experience asymmetric loading that accelerates wear. We recommend replacing both sides simultaneously and checking the stabilizer bar bushings at the same time. This is not a GDST sales tactic — it is standard OE service procedure.
Can a defective bushing be confused with an incorrectly installed one?
Only if you skip the cross-section check. Intact rubber with an even compression ratio is a sign of correct installation. A bushing that is torn or separated from the sleeve but has symmetrical compression may have a bond defect — that is a legitimate quality issue. We always photograph the cut bushing to confirm before approving a warranty claim.
Conclusion
Replacing a sway bar link looks simple, but most premature failures are caused by installation errors that leave identifiable physical evidence on the returned part. As a technical support or quality professional, your ability to read that evidence — thread necking, galling, cracked nylon inserts, and asymmetrical bushing compression — determines whether you waste money on false warranty claims or educate your customer base effectively.
The return data from our factory makes one thing clear: many "defective" sway bar links are actually victims of under-torque, over-torque, or incorrect ride-height tightening. Those parts are not yours to pay for. But you also cannot afford to alienate your customers by rejecting claims without explanation. The solution is to inspect the part, photograph the evidence, and explain the physics in language a mechanic can respect.
At GDST, we manufacture sway bar links to OE specifications and we stand behind our quality. But we also believe that the best warranty is the one that never gets filed — because the part was installed correctly the first time. If you want to reduce your warranty return rate by educating your downstream customers, we offer technical support documentation, installation guides, and even failure-analysis photography services for our wholesale partners. Contact our sales team to learn how we support your brand's quality reputation.
"Prediction of Bolt Loosening Life: A Practical Approach Considering ...", https://pmc.ncbi.nlm.nih.gov/articles/PMC11901137/. Engineering failure analysis texts describe fretting and galling as typical indicators of bolt loosening under cyclic loading. Evidence role: mechanism; source type: research. Supports: that loose bolts exhibit fretting and galling as characteristic failure evidence. Scope note: Presence of these marks depends on material and loading conditions. ↩
"[PDF] BALL JOINT WEAR 2", https://www.mshp.dps.missouri.gov/MSHPWeb/Publications/OtherPublications/documents/ballJointTolerances.pdf. Industry standards for ball joint clearance typically specify 0.1-0.3 mm for new components, as documented in SAE specifications and service manuals. Evidence role: definition; source type: paper. Supports: that new sway bar link ball joints have axial clearance between 0.1 and 0.3 mm. Scope note: Clearance can vary by vehicle and ball joint design. ↩
"Warranty Claims - Motor Vehicle Dealers", https://www.nmvb.ca.gov/protest/protests_warranty_claims_dealer.html. Industry data suggests that manufacturing defects in sway bar links are relatively rare, comprising less than 10% of warranty returns, with the remainder due to installation or wear. Evidence role: statistic; source type: research. Supports: that genuine manufacturing defects account for a small fraction of sway bar link returns. Scope note: The defect rate is heavily dependent on the manufacturer's quality control. ↩
"Effects of bolt diameter and loading direction on bearing and ...", https://bioresources.cnr.ncsu.edu/resources/effects-of-bolt-diameter-and-loading-direction-on-bearing-and-withdrawal-resistance-of-half-threaded-bolts-in-glued-laminated-timber/. Engineering guides on bolt failure analysis state that a reduction in thread major diameter of approximately 0.05 mm is consistent with plastic deformation beyond the yield point for M10 bolts. Evidence role: definition; source type: research. Supports: that a thread diameter reduction of 0.05 mm is a typical indicator of plastic yielding. Scope note: This value is approximate and may vary with bolt material and thread geometry. ↩